How To Use
In the CRPlayer, the jacket and turntable are placed in above and below for visual pleasure. (In landscape on the iPad, they placed side by side.)
Note: All "record" in this article refer to vinyl records.
Note: Descriptions related to the settings panel apply if you have purchased Extra Features or a trial of Extra Features.
The settings panel is explained on the Settings Panel page.
Select Songs
You can select songs from your music library or Record Shelf.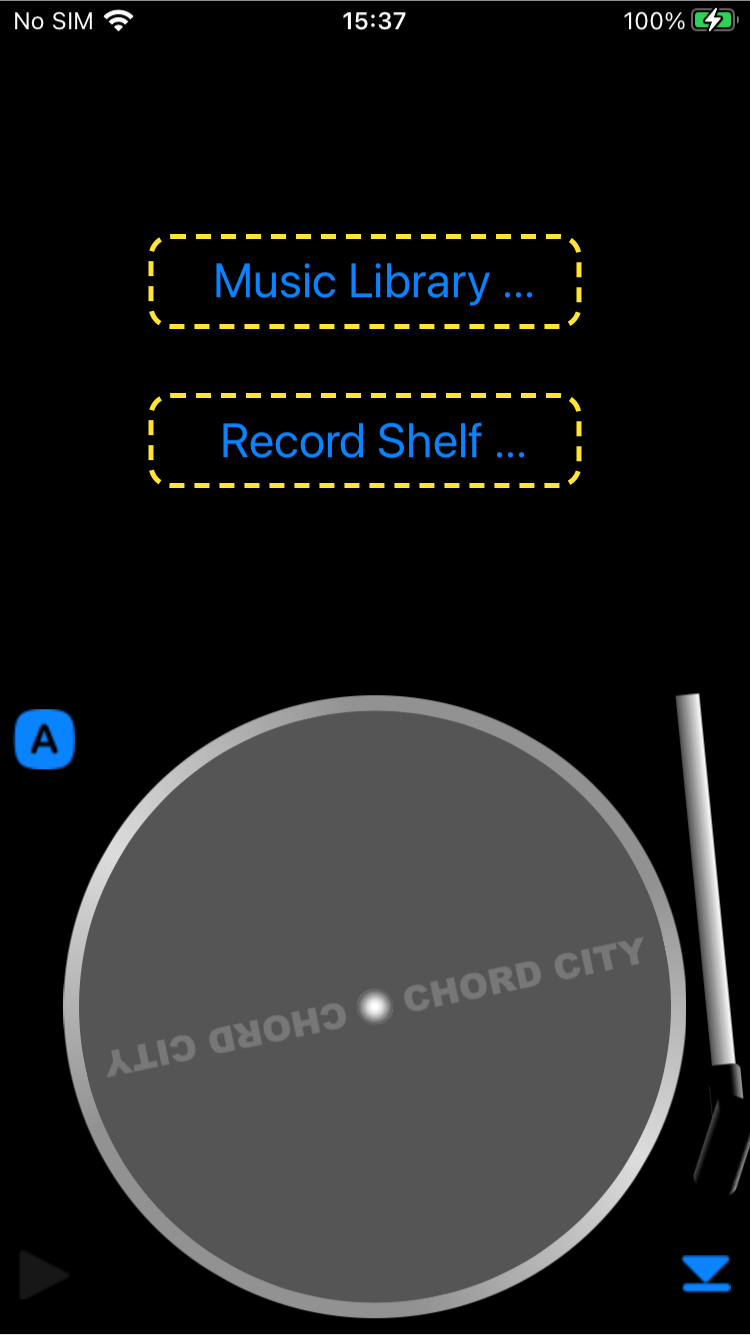
Select songs from your music library
Tapping "Music Library..." will display the navigation screen of the iPod library.
Note: You may be asked for confirmation the first time you access your iPod library from this app.
Select songs to be packed as the record here. It is OK to select just one song or an actual album or playlist as it is.
Finish selecting songs and exit the iPod navigation screen to begin playback or cancel to return the original screen without playback.
You can set the color of the record and the label, the amount of scratch noise, etc. to your liking on the settings panel in advance.
Select from Record Shelf
When virtual records are stored in the Record Shelf, tapping "Record Shelf..." will bring up a dialog showing the list of stored virtual records.
Select a virtual record with tapping to begin playback, or tap "Return" to return to the original screen without playback.
On the settings panel, you can create virtual records and save them into the Record Shelf.
Begin Playback
Once you have finished selecting songs from your music library or a virtual record from your Record Shelf, a record jacket appears above to the turntable, and a record inside will be set on the turntable, then tone arm automatically moves and player starts playback.
Depending on the number of songs on the record and the total playing time, the format and rotation speed of the record are selected as follows.
Note: If the speed is set to something other than "auto" in the setting panel, it will be played at that speed forcibly.
| Number of Songs, Playing Time | Record Format | RPM |
|---|---|---|
| 2 songs or less |
7 inch Single doughnut record
(an adapter flies from the side and is set on the turntable.) |
45 |
| Less than 14 minutes | 7 inch EP record | 45 |
| Less than 20 minutes | 7 inch Compact record | 33⅓ |
| 20 minutes or more | 12inch LP record | 33⅓ |
Exit Playback
 Swipe up near the center of the front side of the jacket (the side where the artwork is drawn), playback will stop, and exit in the reverse order of the begin.
Record Jacket
While the record is on the turntable, its jacket is placed on the upper side to the turntable. (For iPad landscape, it is placed on the left.)
Front Side
The artwork of the song currently playing is displayed on the front side of the jacket.
With a record that collects songs from various albums, allows you to enjoy the change in artwork each time the song changes.
Note: Songs that do not have artwork set will display the default image.
The following operations can be performed on the jacket surface.
- If you swipe up near the center playback will stop, and exit in the reverse order of the start.
- Tapping around the right edge or the left edge, the jacket is flipped and the back side will be displayed.
Back Side
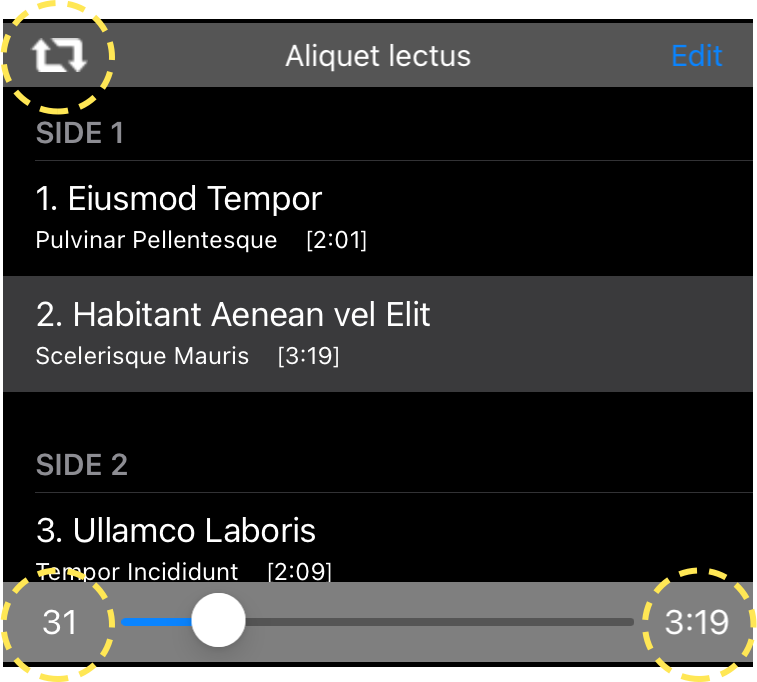
On the back of the jacket, a list of songs (song titles, performers, playback time) on the record is displayed in a table, and the song being played is highlighted.
If there are two or more songs, they will be split into two sections so that you can get the feeling of handling 2 sides of the record.
You can change side notation and whether to treat as 2 sides on the settings panel.
The slider at the bottom indicates the current playback position of the currently playing song. The length of the song being played is displayed on the right side of the slider, and the current playback time is displayed on the left side.
The following operations is enabled on the back side of the jacket.
-
Tap either "
 " on the upper left or the time display area on the left and right of the slider at the bottom to flip the jacket and return to the front side.
- Tap a song in the list to start playing from that song.
- If tapped song is on the other side, the record moves slightly to indicate that it has been flipped.
- Drag the slider to change the playback position.
-
Tap the "Edit" button on the upper right of the back side, then the display changes to "Done" and table will be in edit mode where you can operate the following.
Operation Details Move Drag  on the right side of the item to change its position or order.
Delete Tapping  on the left side of the item will appear a delete tab on the right side to delete this item.
Deleting it will not affect your music library in any way.Note: The tone arm is upped to pause playback when the operation is executed.
When you've done editing, tap the "Done" button to finish edit mode; tap any song or lower the tone arm to continue playback.
Completed Playback of One Side
The behavior after playback of one side is completed is as follows depending on whether auto stop is ON or OFF.
On the settings panel, you can turn auto stop ON or OFF.
Auto Stop Behavior
Off
The tone arm stays on the locked groove and the turntable continues to rotate.
On
The tone arm automatically returns to the home position at the right end and lowers, then the turntable stops rotating.
Operation Button
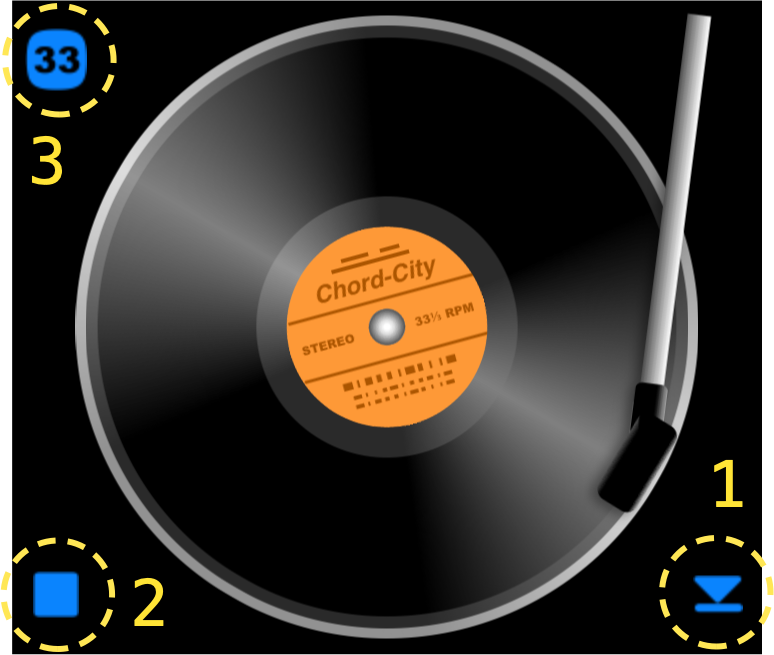 The following three operation buttons are arranged around the turntable.
-
Arm Lifter.
Located at the bottom right of the turntable, displaying the lifted/lowered status of the tone arm. The tone arm is lifted.
 The tone arm is lowered.
Each tap raises or lowers the tone arm.
Note: However, the place where it can be lowered is only the record groove and the home position on the right end. -
Start Stop.
Located in the lower left corner of the turntable to indicate start or stop. Indicate "start".
 Indicate "stop".
Tap to perform the indicated operation.
Note: It is disabled when there is no record on the turntable. -
Speed Display.
Located on the upper left of the turntable, it displays the rotation speed of the turntable. Auto
Auto
 33⅓ rpm.
 45 rpm.
When playback ends and the record disappears from the turntable, the display switches to "Auto".
Note: This button doubles as a settings panel invoker, and when you tap it, the setting panel appears.
Start Operation
Tap ![]() button to start from the beginning of the current side.
button to start from the beginning of the current side.
Long-press it to start from the beginning of the other side (at this time, the vinyl record moves slightly implying a turning upside down).
Playback will start with the following steps.
- The tone arm lifts and the turntable starts rotating.
- The tone arm moves over to the outermost groove of the record.
- The tone arm lowers and playback begins.
Stop Operation
Tapping ![]() button, playback will stop with the following steps.
button, playback will stop with the following steps.
- The tone arm lifts and playback is paused.
- The tone arm moves to the home position on the right end.
- The tone arm lowers, the turntable stops rotating and playback stoped.
Tone Arm Operation
When the tone arm is lowered at the right end (home position), the turntable stops, otherwise it rotates.
When the tone arm is lifted, it can be freely dragged from the right end (home position) to near the center of the turntable.
This allows playback from any position of the record. (However, it can only be lowered at the record groove and the home position.)
- Lifts the tone arm with lifter to pause playback.
- Drag the tone arm to any position on the sound groove.
- Lower the tone arm with lifter and resume playing.
During playback, raising the tone arm pauses playback and lowering resumes playback. (This is the same as the play/pause function of a general music player.)
Note: When the device audio is handed over to another app or the output destination of the device audio is changed, the tonearm is raised and playback is paused.
| Trick | Operation |
|---|---|
| Sound Skipping | Keep touching the tonearm, you can make the sound skipping about every rotation. |
| Tapping |
A trick that can't be played with a real record player, but if you tap in succession the tonearm during playback, it will repeat from the first tapped playback time with each tap.
The playback time is cleared when the tap interval is extended by one rotation or more. |
| You can turn on or off whether Sound Skipping or Tapping is possible with the "Interfere" switch on the settings panel. | |
Turntable Operation
When the tone arm is down at the right end (home position), the turntable stops, otherwise it rotates.
The turntable rotation speed is usually determined by the record format selected (as shown in the table above).
The currently set rotation speed is displayed in the speed display on the upper left of the turntable.
On the settings panel, you can freely switch the rotation speed or fine-tune the rotation speed between 200 cents up and down in 25 cent increments.
| Trick | Operation |
|---|---|
| Wrong Speed | If you intentionally select a speed that is not the original speed, such as selecting 45 rpm for an LP, you can cause a "wrong speed" in which the pitch of the playback sound is greatly deviated. |
| Braking |
Touching the record groove on the turntable will brake the rotation.
The braking action is zero when the touch is closer to the center, and is greater when it is closer to the periphery of the record. Tip: You can make the playback sound vibrato by shaking the touch in the radial direction while applying the brake lightly. |
| Drag |
You can drag the turntable to play like scrubbing or scratching.
(Currently reverse playback is not supported, so it is different from real scrubbing.)
Tip: You can't drag records directly with this app. If you want to play with dragging, a 7 inch record will make the wider turntable area and easier to play. |
| You can turn on or off whether Braking or Drag is possible with the "Interfere" switch on the settings panel. | |