Settings Panel
The settings panel allows you to set and adjust instrument pitch, keyboard, volume, reverb, percussion, rotor effects, and more.
To close a panel, tap the Done button below panel or swipe right on that panel.
This chapter contains the following sections:
- Attenuation
- Reverb
- Pitch and Pitch Tuner
- Keyboard Settings
- Expression
- Drawbar Rate
- Tick Sounds of Switches and Drawbars
- Percussion
- Rotor
Attenuate
Decreases the output of the sound generator by the amount selected by the right selector.
If the volume tend become excessively loud by the drawbar settings, number of keys pressed, and other performance conditions, you can prevent distortion by increasing the amount of attenuation.
Reverb
Change the amount of reverb effect on the sound with the slider to the right.
Move the slider all the way to the left to bypass the reverb effect.
Pitch and Pitch Tuner
The deviation of the current pitch from standard (A=440 Hz) is displayed in cents next to the "Pitch" label in the top left.
The pitch of this instrument can be adjusted with the pitch tuner.
Tap the tuning fork button ![]() to the right of the pitch display to bring up the pitch tuner dialog.
to the right of the pitch display to bring up the pitch tuner dialog.
A tuning tone representing the current pitch will continue to sound while the dialog is displayed. (You can adjust the volume of the tuning tone with the "Volume" slider.)
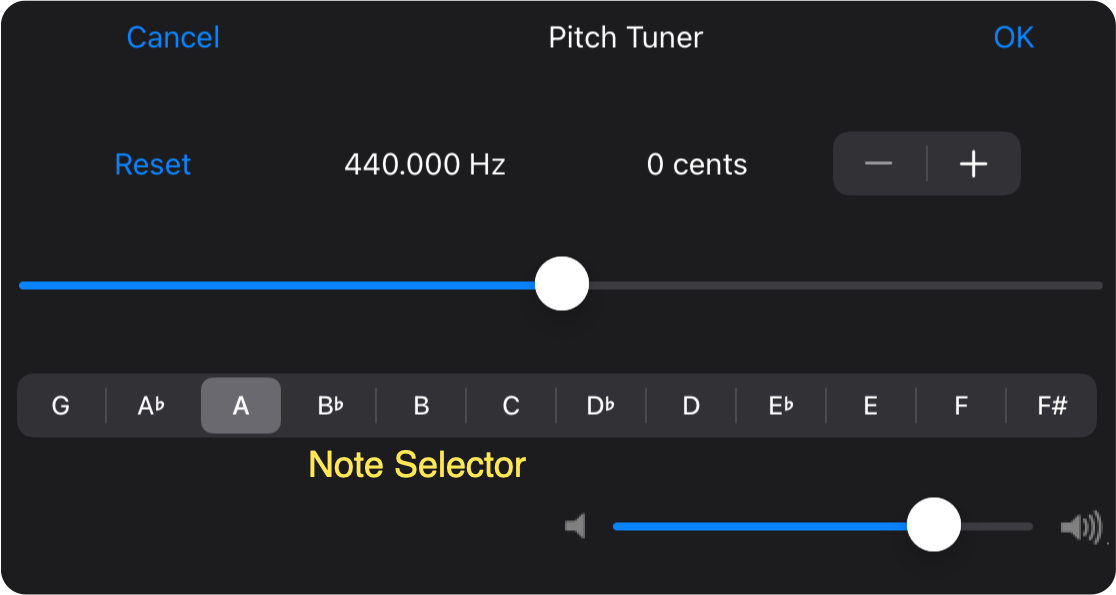
The tuning tone's frequency and deviation from standard pitch (in cents) are displayed on the center top label.
You can adjust the pitch deviation from -100 to +100 cents using the pitch slider. You can also adjust in cent increments with the "-+" stepper on the right.
Tap Reset on the left to return the pitch to normal (zero deviation).
The note selector lets you choose tuning notes from G4 to F#5 (A4 is the default).
To match the pitch with other instruments, play the same note and adjust it so that it doesn't growl.
Tap "OK" to apply the adjustment results to this instrument, otherwise tap "Cancel".
Keyboard Settings
You can change the note range and number of keys of the mini-keyboard.
| Display | Description |
|---|---|
| Keyboard Start Note |
The note name of the leftmost key of the mini-keyboard is displayed. (It is set to C4 by default.)
You can change the range of the mini keyboard by moving up and down with the stepper on the right. |
| Keyboard Size | You can select the size (number of keys) of the mini-keyboard with the selector on the right. |
Expression
You can select how to apply the expression(strength of sound) effect with the selector to the right of the "Expression" display.
| Selection | Description |
|---|---|
| - | No expression |
| Tilt |

The sound is louder when the device is tilted horizontally, and softer when tilted upright |
| MIDI |
Controlled with the expression control message of MIDI.
Note: A MIDI device that can transmit the expression control message must be connected. See MIDI Settings for Details. |
Drawbar Rate
You can select the degree of volume change for the 1 scale of the drawbar position.
The higher the number, the greater the volume reduction when the drawbars are pushed in.
Tick Sounds of Switches and Drawbars
You can emphasize or weaken the sounds that are produced when operating switches and drawbars.
| Display | Description |
|---|---|
| Drawbar Tick Sound | Adjusted with the slider on the right. |
| Switch Tick Sound | Adjusted with the slider on the right. |
Percussion
When using percussion, you can choose whether or not to make it specific to the traditional Hammond organ B3.
| Display | Description |
|---|---|
| Percussion with 1' Tone Muted | When the switch on the right is ON, turning the percussion ON will mute the 1' tone of the B drawbars. |
| Percussion with Single Trigger |
When the switch on the right is ON, it becomes a single trigger percussion.
In this case, in legato performance, only the first percussion note sounds, and the next percussion does not sound unless the keyboard is completely released. |
Rotor
You can adjust the function to express the rotor effect by the rotating speaker according to your preference as shown below.
| Display | Description |
|---|---|
| Rotor Effect |
The spread of the rotor effect can be adjusted with the slider on the right.
Tip: Move the slider to the left if you feel the spread is too strong. |
| Rotor Change Time |
Use the slider on the right to adjust the time lag for changing the rotation speed when switching the rotor speed with the rotor switch.
The more the slider is moved to the right, the longer it takes to change, and the slower the speed changes. |
| Rotor Slow Speed |
The slider on the right adjusts the number of rotations when the rotor switch is at low speed (S).
The more the slider is moved to the right, the faster the rotation. |
| Rotor Fast Speed |
The right slider adjusts the number of rotations when the rotor switch is in high speed (F).
The more the slider is moved to the right, the faster the rotation. |