Quick Start
CC Harp consists of Main screen and several sub-screens: Settings, Utilities, PlayAlong, and Synthesizer, and a User Guide (this document).
Details of each sub-screen are described on the explanation page for each screen.
Note: Explanations related to sub-screens is applied if you have purchased Extra Features, Extra Features Trial or paid version.
Main Screen
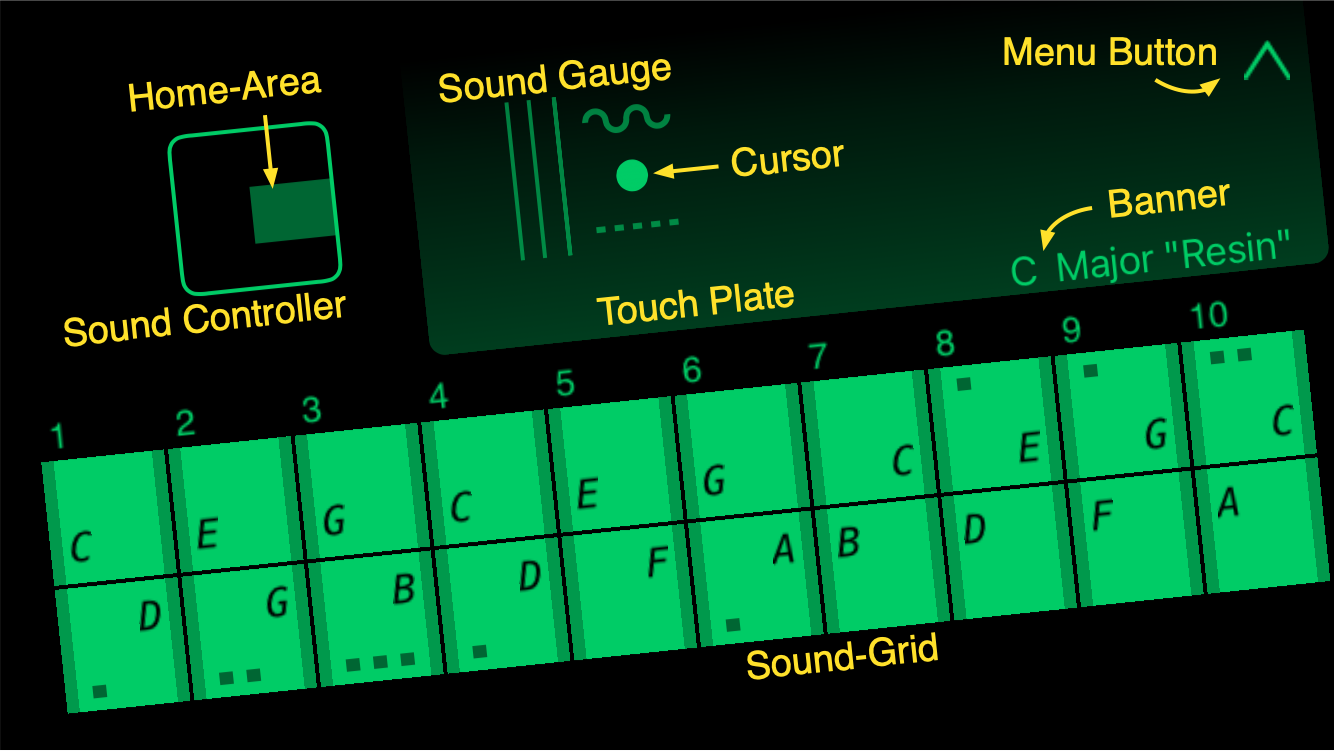
The Main screen is the screen for performing music, and configured as follows.
How to Hold
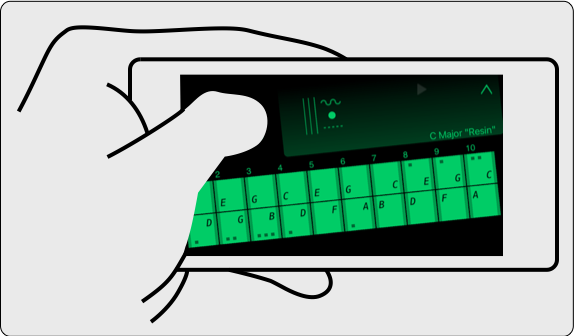 Place the device horizontally in your left palm.
Put your left thumb on the center of the home area in the Sound Controller. It's also a good idea to place your right thumb or left little finger at the bottom of the device to support it.
Note: Mind the direction of the device so that your palm does not cover the device sound output.
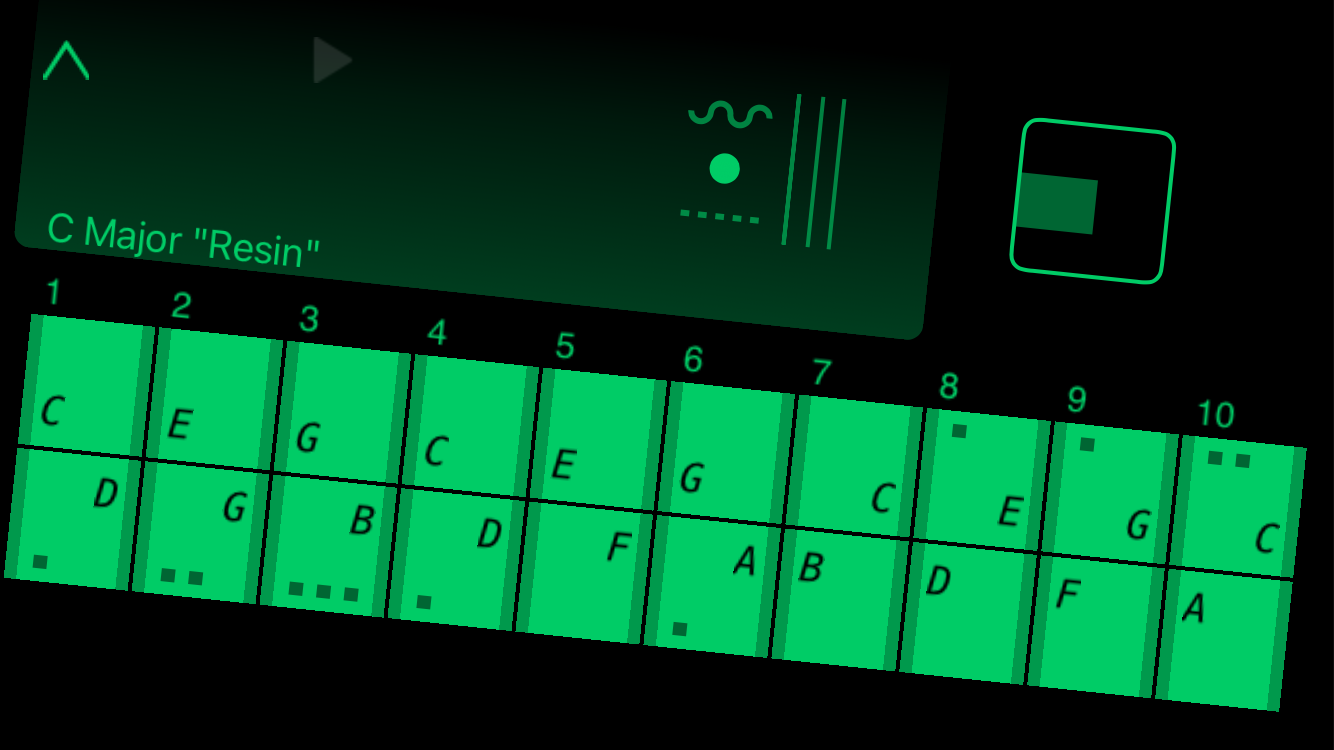 Left-Handed compatible
The Main screen layout can be flipped for left-handed users with the "Left-Handed" switch in the "CC Harp" section of the device settings app.
Settings > CC Harp > Left-Handed
Sound-Grid
The Sound-Grid, which looks like an actual harmonica hole arrangement, is a plane where touch makes a sound and its location determines its note.
The numbers from 1 to 10 above each square corresponds to the harmonica hole number.
The letter in each square is the note name or interval notation assigned to that square.
Details are described in the "Settings"chapter of the user guide.
Touching any square of the upper or lower side sounds the same note as blowing or drawing the same hole of an actual harmonica.
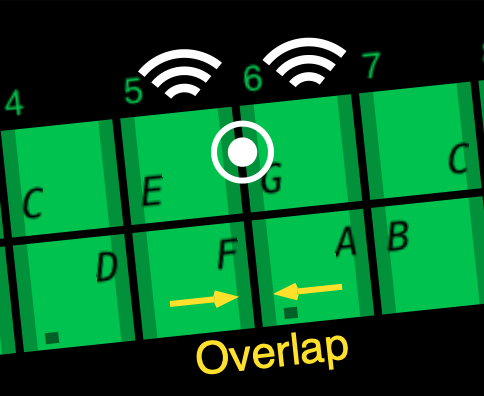 Dim zone between the adjacent squares is the overlap, where a touch causes double-notes--both note of squares sound together (The sound of both squares will be played at the same time).
You can change the width of the overlap on the Utilities screen.
The Sound-Grid supports up to 2 independent touches for harmonica-like play such as octave playing and various splittings.
For various multi-notes using two touches, please refer to the Multi-Notes section of the Utilities chapter of the User Guide.
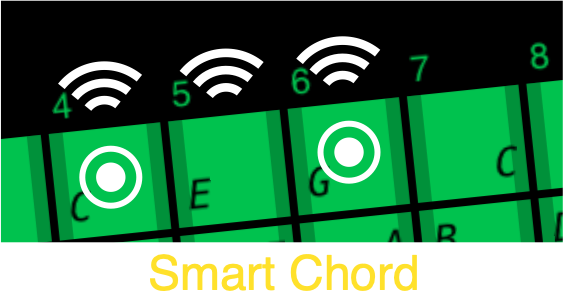 Touching two squares sandwiching one square sounds the notes of these three squares with the Smart-Chord feature. For example, if you touch the “C” and “G” squares of upper side, a note of the "E" square will be also sounded.
You can set whether to use this feature on the Utilities screen.
 Shaking your finger left and right slightly on the square, a vibrato effect will be added to the sound.
You can change the sensitivity of the vibrato on the Utilities screen.
The details of the function of the Sound-Grid are described in the "Utilities" chapter of the user guide.

Using the keyboard style allows you to enjoy playing harmonica-like music without being bothered by the limitations of the harmonica's unique scale.
Sound Controller
The pitch and tone effect of the sound changes depending on the touch position of your finger placed on the Sound Controller.
Dim area of the Sound Controller is the Home-Area where the touch position does not significantly affect the sound.
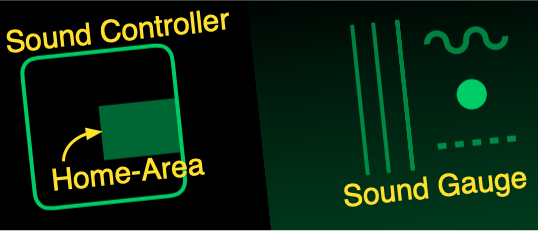 The Sound Gauge is a gadget that allows you to check the position of the touch without being disturbed by your finger, and the dot inside it moves as a cursor that indicates the touch position.
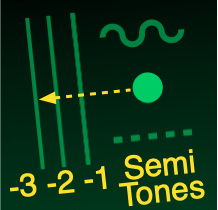 Moving the touch to the left from the home area also moves the cursor to the left, and makes bending (pitch down of the sound) accordingly.
The three vertical lines of the Sound Gauge are the bending scales, which indicate where the pitch is 1, 2, and 3 semitones down, respectively.
However, the maximum value that can actually be bent depends on each square of the Sound-Grid, just like a real harmonica.
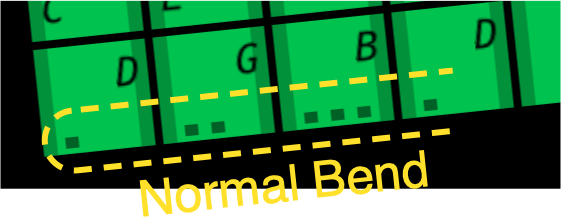 That value is shown by the count of dots at edge of the square (1 semitone per dot).
f it doesn't have to work like a real harmonica, every square can have 3 semitone bendable range by selecting the Free Bend feature on the Utilities screen.
Bending features are described in the "Utilities" chapter of the user guide.
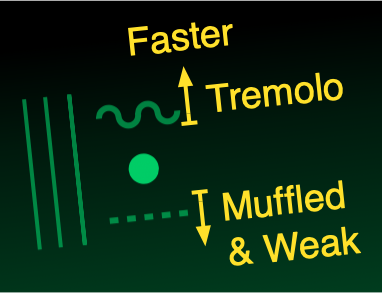 Moving the touch downward from the dotted line makes the sound muffled as if it's closed with your hand, and further moving below the home area makes it a bit weaker.
Conversely, moving the touch toward the ceiling causes a tremolo effect, and the tremolo cycle is faster as the touch is closer to the ceiling.
When you release the touch, the cursor will return to the middle of the home area.
Tip: You can express a manual tremolo with repeatedly tapping the bottom part of the controller.
Size and Position of the Sound Controller
You can change the size and position of the sound controller on the utility screen.
For more information, see the "Utilities" chapter of the user guide.
Banner
Displays the currently applied instrument settings, such as key, pitch, tuning, and sound.

The details are described in the "Settings" chapter of the user guide.
Enjoy the Performance
By making good use of them, you can handle this instrument as if you were playing a harmonica;
immediately after launching this app, the instrument key is "C" and the tuning is "Major".
You can enjoy playing as it is, but understanding many of the features of this app that you can access from the menu will allow you to take advantage of this instrument in more ways.
Menu
Tapping the Menu button at the top right brings down a row of menu icons, which will disappear by touching anywhere on the screen.
Note: If you have not purchased Extra Features or Extra Features Trial, only the "Utility" and "User Guide" icons will be displayed.
![]()
A sub-screen or user guide relating to the icon will appear by tapping one of these icons.
Note: Be sure to release all touches from the screen when tapping the menu to prevent unexpected operation.
| Icon | Sub Screen | What you can do |
|---|---|---|
| Utilities | Adjust various sound effects, special features and appearances. | |
| Settings | Set musical characteristics: pitch, key, tuning, sound, etc. | |
| PlayAlong | Operate the play-along player. | |
| Synthesizer | Manipulate the sound synthesizer and sound storage. | |
| User Guide | Read the User Guide page. | |
User Guide
The User Guide explains all of the features of this application that organized by relevant sub screen.
Tapping ![]() icon in the Menu will invoke quick start page--this page--, the first page of the user guide.
icon in the Menu will invoke quick start page--this page--, the first page of the user guide.
You can navigate through the User Guide by the navigation bar at the bottom.
Tip: Swipe gesture on the page from the left (right) edge to the right (left) turns the page backward (forward).
To return to the main screen, tap "Done" at the left end of the navigation bar.
Tip: For your convenience, a quick how-to is in the first section of the appendix.
If you have any questions or concerns, feel free to contact us at support@chord-city.com