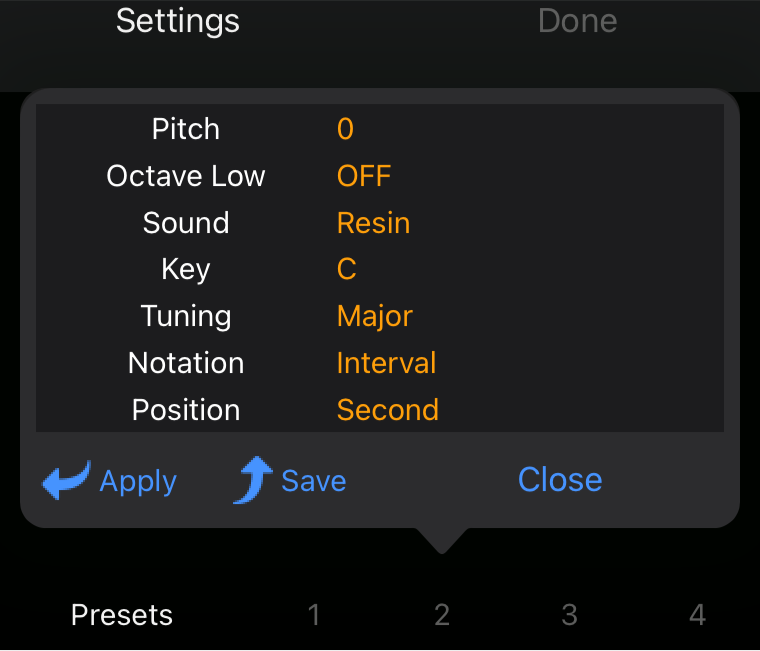
Settings Screen
Settings screen allows you to set up various musical characteristics of this instrument.
To close the settings screen, tap the "Done" button at the top right or swipe right on the screen.
Tip: On this screen, the main screen will respond as normal, so you can check it without closing the dialog.
This chapter includes the following sections:
- Pitch
- Pitch-Tuner Dialog
- Octave-Low
- Sound
- Board Style
- Number of Keys
- Key Shift
- Key
- Tuning
- Notation
- Position
- Preset
- Settings Banner
Pitch
The current pitch deviation from standard (A=440 Hz) is displayed in cents to the right of the Pitch label.
The pitch of this instrument can be adjusted in the Pitch Tuner dialog.
Tapping ![]() on the right side of the pitch display will bring up the pitch-tuner dialog.
on the right side of the pitch display will bring up the pitch-tuner dialog.
Pitch-Tuner Dialog
The dialog continues to sound the tuning tone representing the current pitch;
you can adjust the tuning tone volume with the "Volume" slider.
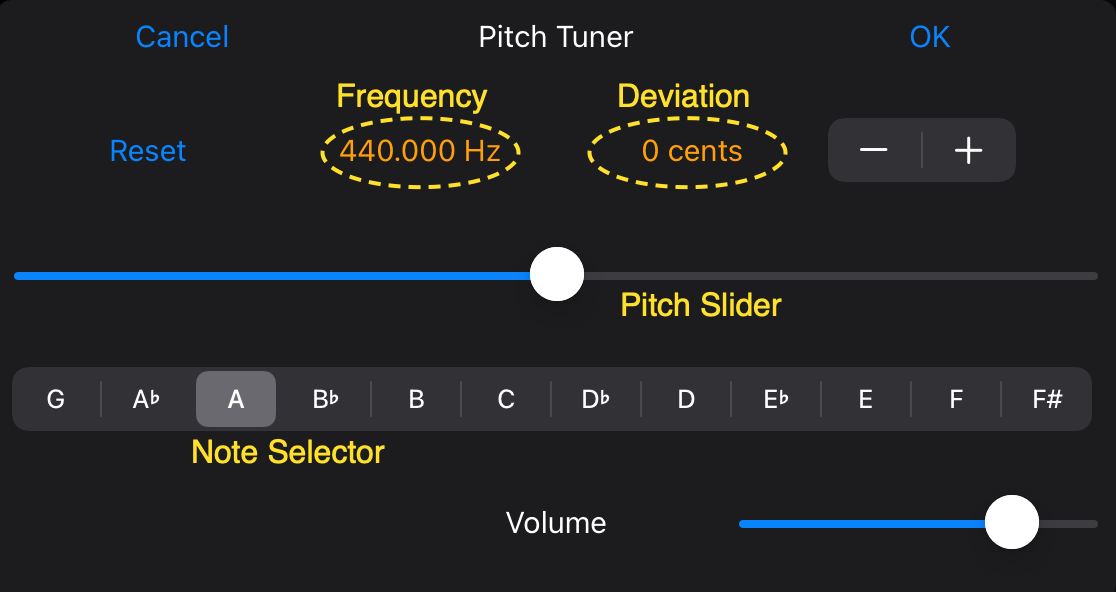
The frequency of the tuning tone and the deviation from the standard pitch are displayed in the upper center labels.
You can adjust the pitch deviation in the range from -100 to +100 cents with the pitch slider;
also can adjust in 1 cent increments with the "- +" stepper on the right side.
To return the pitch to the standard and the deviation to zero, tap the "Reset" on the left.
You can choose a tuning note from G4 to F#5 (A4 is default) with the note selector.
To match the pitch with other instruments, play the same note and adjust so that there is no growl.
Tap the "OK" to apply the adjustment, otherwise tap the "Cancel".
Octave-Low
Tapping the “Octave-Low” toggles whether lower the pitch by one octave.
Sound
The currently set sound name is displayed to the right of the "Sound" label.
Tapping ![]() to the right of the sound name will bring up a dialog where you can select a sound.
to the right of the sound name will bring up a dialog where you can select a sound.
The list shows sounds stored in the sound shelf and sounds currently being edited in the synthesizer screen.
Tap "OK" to accept the selected sound, or tap "Cancel" or swipe right on the dialog to revert to the original setting.
Sound Shelf
The sound shelf is where you store sound data, and it already contains harmonica-type sounds and some built-in sounds.
Tip: In the Synthesizer screen, you can edit the sounds on the sound shelf and save the sounds you create to the shelf.
The sound-shelf and the sound synthesizer are described in the "Synthesizer" chapter of the User Guide.
A brief description about the built-in sounds is in the "Appendix" of the User Guide.
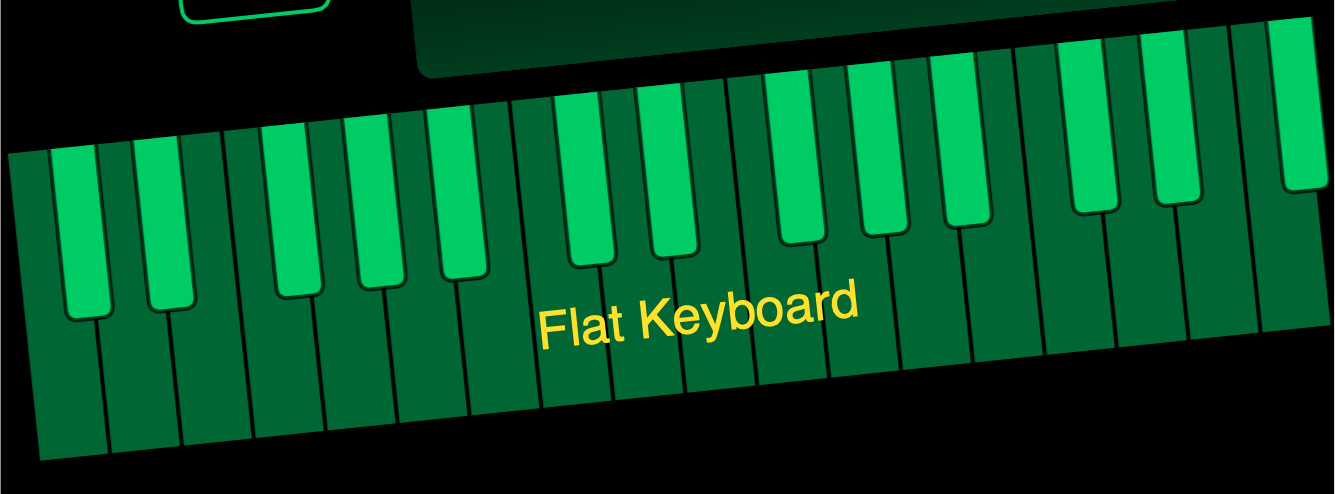
Board Style
You can choose between a harmonica hole style or flat keyboard style playing board.
Using a flat keyboard allows you to enjoy harmonica-like playing without having to bother about harmonica-specific scales.
On the other hand, using the harmonica hole allows you to pursue a more authentic playing style that is unique to the harmonica.
Note: In keyboard style, all notes can be bent down by up to 3 semitones.
The remaining settings are divided into those that are only displayed when the board style selection is Flat Keyboard, and is Harmonica Hall, as shown below.
- Keyboard Style Settings
- Number of Keys
- Keyboard Shift
- Harmonica Style Settings
- Key
- Tuning
- Notation
- Position
- Preset
Number of Keys
You can select the number of keys that are displayed on the keyboard.
Keyboard Shift
By selecting the note name at the left end of the keyboard, you can shift the range of the entire keyboard to match the piece you are playing.
Key
The currently set harmonica key is displayed to the right of the "Key" label (the default key is "C").
Tapping ![]() to the right of the key display will bring up a dialog where you can select a key.
to the right of the key display will bring up a dialog where you can select a key.
To close the dialog, tap "Close" or swipe right on the dialog.
Tuning
The currently set tuning is displayed to the right of the "Tuning" label.
Tapping ![]() on the right of the tuning display will bring up a dialog where you can choose tunings such as "Major" ,"Natural Minor","Harmonic Minor", and "Country" etc.
on the right of the tuning display will bring up a dialog where you can choose tunings such as "Major" ,"Natural Minor","Harmonic Minor", and "Country" etc.
To accept the selected tuning, tap "OK", or to revert, tap "Cancel" or swipe right on the dialog.
Solo Tuning
Selecting a chromatic tuning such as "Solo" allows you to play in a similar way to using a slide on a chromatic harmonica.
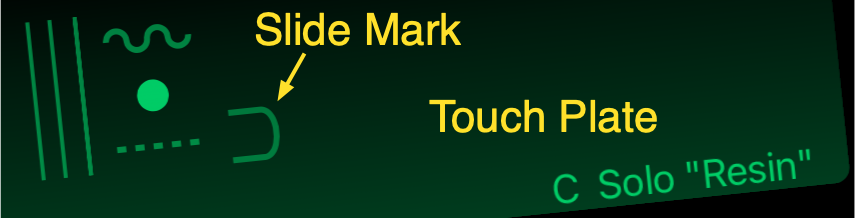
- A slide mark appears to the right of the sound gauge, indicating that the slide function is enabled.
- Touching the touch plate will press the slide mark, raising the pitch by a semitone.
This allows you to play chromatically.
Notation
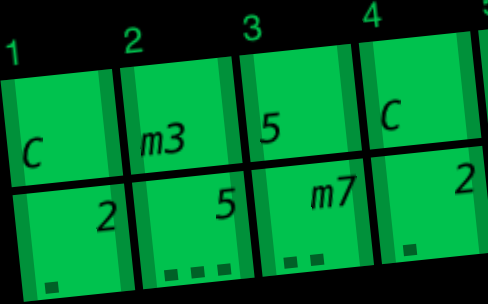
Each square in the sound grid displays the note name assigned to it according to the notation system.
The currently set notation method is displayed to the right of the "Notation method" label.
Tapping ![]() to the right of the notation display will bring up a dialog where you can select from the five notation systems explained below.
to the right of the notation display will bring up a dialog where you can select from the five notation systems explained below.
To use the selected notation method, tap "OK." To revert to the original setting, tap "Cancel" or swipe right on the dialog.
| Notation | Meaning | Sound-Grid |
|---|---|---|
| Blank | No display is made. | |
| Root | The note names are displayed only in the square that is the root of the scale. | 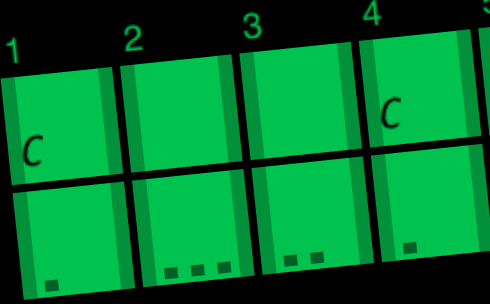 |
| Interval |
The note names are displayed in the square that is the root of the scale, and the intervals from the root are displayed in the other squares.
The meaning of interval notation is described in the "Appendix" of the User Guide. |
 |
| DoReMi | The names in the solfège notation with the movable Do method are displayed. | 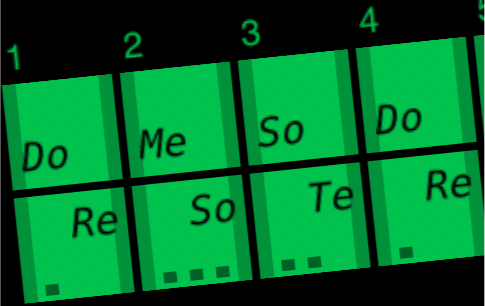 |
| Full | All squares display the corresponding note names. |  |
Position
Positions are mode assignments for playing the harmonica assuming a root note different from the label key.
When combined with bending techniques, you can play scales in a key other than the label key. For example, a harmonica with a label key of "C" can be played in the key of "G" by assigning it to second position (Mixolydian mode).
A table showing the relationship between positions, roots, modes and tunings is provided in the Appendix of the user guide.
The currently set position is displayed to the right of the "Position" label.
Tapping ![]() to the right of the position display will bring up a dialog where you can select a position.
to the right of the position display will bring up a dialog where you can select a position.
If the notation setting represents notes on a scale such as "Root", "Interval" or "DoReMi", selecting a position will change the contents of the sound grid to show the scale specified by the position.
Note: If the notation setting is scale-independent, such as "Blank" or "Full," the position setting has no meaning.
Preset
You can save the current combination of "Pitch," "Octave Lower," "Key," "Tuning," "Sound," "Notation," and "Position" settings in one of four presets.
Tapping on any preset number will bring up a dialog showing what is already saved there.
| Button | Operation |
|---|---|
 | This preset contents will be applied to each setting and the dialog will close. |
| Saves the current settings to this preset.
Note: Any content already saved will be overwritten. |
|
Swipe the settings banner right or left to cycle through the preset numbers, and release your finger to apply the settings saved with that preset number. (Preset number 0 applies the default settings.)
Settings Banner
Most of the settings are displayed as a banner on the main screen.
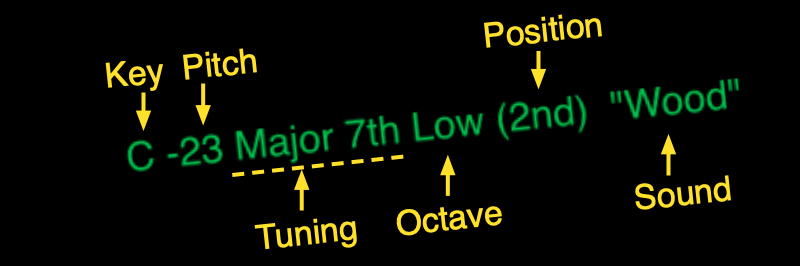
- If the pitch setting is non-zero, the "pitch" is displayed as deviation in cents.
- If Octave Lower is on, Low is displayed.
- If the notation method is "root," "interval," or "do-re-mi," the position is displayed in parentheses.
The key, sound, is always displayed (sound is displayed in quotation marks at the far right of the banner).
Tip: Swipe right or left on the settings banner to cycle through the presets you apply.